The Ultimate Guide to Solder Sleeve Seal Heat Shrink Butt Wire Connectors Terminals Waterproof: Waterproof, Durable, and Reliable
Beyond Waterproofing: The Engineering Marvel of Solder Sleeve Seal Butt Connectors
Forget traditional crimps and messy soldering irons. Solder Sleeve Seal Heat Shrink Butt Wire Connectors, Terminals, Waterproof represent a revolutionary leap in creating permanent, protected electrical joints. These ingenious devices combine mechanical connection, electrical bonding, and environmental sealing into a single, heat-activated process. Ideal for demanding environments from automotive underbellies to marine decks and industrial control panels, they solve critical problems of corrosion, vibration failure, and moisture ingress that plague standard connectors. Understanding their design and mastering their application unlocks unparalleled reliability in electrical systems.
Deconstructing the Design: How Solder Sleeves Achieve Perfection
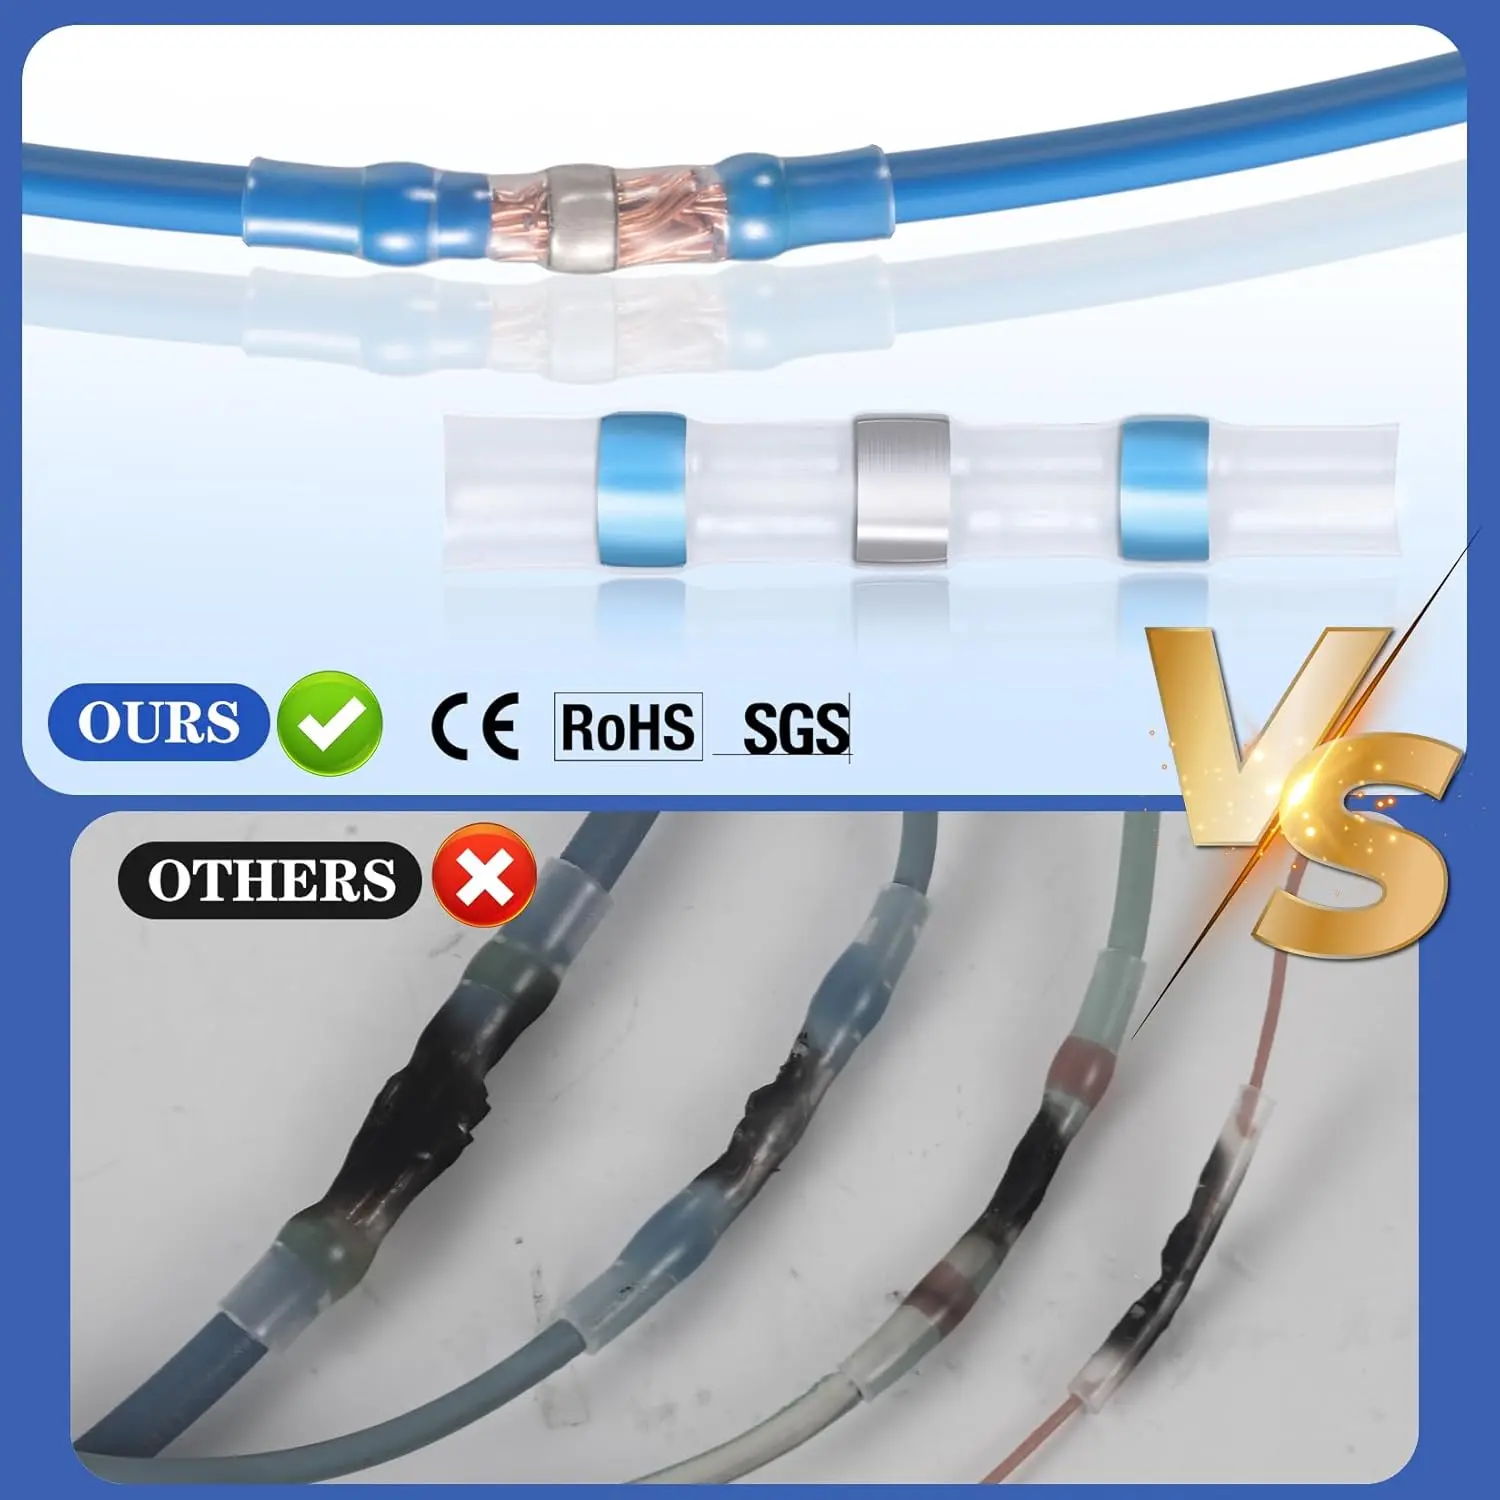
The effectiveness of a solder sleeve connector lies in its sophisticated multi-layer construction, each element playing a critical role:
- Outer Shield: High-Grade Polyolefin Heat Shrink Tubing
- Function: Provides robust mechanical protection, insulation, and the primary sealing force.
- Properties: Chemically resistant, flexible, UV-stable (for outdoor use), and shrinks radially (typically 3:1 or 4:1 ratio) when heated.
- Key Feature (Translucency): Allows visual confirmation of solder flow and adhesive activation during heating – a crucial quality control advantage.
- The Bonding Core: Precision Low-Temperature Solder Ring
- Function: Creates a metallurgical, gas-tight electrical bond between the wire conductors.
- Science: Formulated with a melting point significantly lower than standard electronics solder (often around 120-150°C vs. 180-220°C). This prevents damage to the wire insulation and the outer tubing during application.
- Process: Upon heating, the ring melts, wicks into the wire strands via capillary action, and solidifies into a solid solder joint superior in conductivity and vibration resistance to most crimps.
- The Sealing Engine: Internal Hot-Melt Adhesive Lining
- Function: Creates an impervious, strain-relieved environmental seal around the wire entry points.
- Activation: The adhesive melts concurrently with the solder and outer tubing shrinkage.
- Sealing Mechanism: Molten adhesive is forced under pressure into every microscopic gap between the wires and the connector body, and between the wire insulation and the shrinking tubing. Upon cooling, it forms a flexible, waterproof, and often chemical-resistant barrier.
- Strain Relief: Encapsulates the wire near the entry point, reducing stress on the electrical connection from flexing or pulling.
Mastering Installation: The Art and Science of Applying Solder Sleeves
Achieving a flawless waterproof heat shrink solder connector requires meticulous preparation and controlled heating:
- Critical Preparation: The Foundation of Success
- Wire Stripping: Strip the insulation from both wires to be joined to the exact length specified by the connector manufacturer (typically matching the solder ring position). Crucially: Expose clean, bright copper. Use sharp strippers to avoid nicking strands. Remove all contamination (dirt, grease, oxidation) with isopropyl alcohol if necessary. Compromised wire ends lead to poor solder flow and weak joints.
- Wire Alignment: Insert the stripped ends fully into the connector from opposite sides until they meet firmly within the center of the solder ring. Ensure no insulation extends under the tubing where the adhesive needs to seal. A slight twist of the wires can help maximize strand contact before heating.
- The Heating Process: Precision is Paramount
- Tool Selection: Use a quality hot air gun (heat gun) with adjustable temperature and airflow. A pinpoint nozzle attachment is highly recommended for focused heat.
- Temperature Setting: This is critical. Consult the connector datasheet. Typical range is 90-150°C (194-302°F) measured at the connector surface. Start lower; excessive heat damages insulation and tubing. Use an infrared thermometer if possible.
- Technique:
- Begin heating the center of the connector where the solder ring resides.
- Move the heat gun constantly in a small circular motion, rotating the connector to ensure even heat distribution. Avoid concentrating heat on one spot.
- Watch Closely: Through the translucent tubing, observe the solder ring melt and flow evenly around the wires. It should become shiny and concave as it wicks into the strands. Complete solder flow is non-negotiable.
- Once solder flows, smoothly move the heat towards each end of the connector. Observe the tubing shrinking tightly and the adhesive melting and oozing out slightly (typically a clear or amber bead) at both ends. This visual “adhesive ring” confirms seal formation.
- Heating Duration: Continue heating until full shrinkage, solder flow, and adhesive flow are achieved (usually 30-90 seconds total). Do not underheat.
- Cooling and Handling: Patience for Integrity
- Allow the connector to cool naturally and completely (1-2 minutes) before moving or stressing the wires. Premature handling can disturb the molten solder or adhesive, compromising the connection and seal.
- Inspect the cooled joint: Tubing should be tightly conformed, adhesive visible at both ends, and the solder joint solid (visible through tubing).
The Science of Sealing: Understanding IP67 and Beyond
The IP67 waterproof rating assigned to quality solder sleeves isn’t just marketing:
- IP Code Decoded: IP67 means:
- 6: Complete protection against dust ingress (dust-tight).
- 7: Protection against the effects of immersion in water between 15cm and 1m depth for up to 30 minutes.
- How Solder Sleeves Achieve This:
- Radial Compression: The shrinking tubing applies constant pressure.
- Adhesive Intrusion: The molten adhesive penetrates the interstitial spaces between wire strands and between wire insulation and tubing, blocking potential water paths.
- Solder Barrier: The internal solder joint itself acts as a moisture barrier within the conductor bundle.
- Beyond IP67: While IP67 covers most scenarios, prolonged submersion, high-pressure water jets (IP69K), or aggressive chemicals may require additional protection (e.g., over-molding). Solder sleeves provide the critical primary seal.
Unmatched Benefits: Why Choose Solder Sleeve Sealed Connectors?
- Unrivaled Environmental Protection: Creates a hermetic seal waterproof connector against moisture, dust, fuels, oils, solvents, and salt spray – essential for marine electrical connections, automotive wiring repair, and industrial electrical terminals.
- Superior Electrical Connection: The solder joint offers lower resistance, better current carrying capacity, and significantly higher resistance to vibration fatigue and thermal cycling than crimp connectors. Eliminates “cold solder joints.”
- Enhanced Mechanical Durability: The heat-shrink tubing provides abrasion resistance and strain relief, while the adhesive encapsulates the wire ends, preventing strand breakage.
- Simplified Process & Tooling: Requires only a heat gun and wire strippers. Eliminates the need for crimpers, soldering irons, solder, flux, and separate heat shrink or tape. Reduces error potential.
- Corrosion Resistance: By sealing out oxygen and contaminants, the connection is highly resistant to galvanic and atmospheric corrosion.
- Compact and Professional: Creates a neat, low-profile joint compared to bulky crimp connectors wrapped in tape.
Critical Applications: Where Solder Sleeves Shine
- Automotive & Transportation:
- Automotive wiring harness repair (engine bay, underbody, lighting).
- Trailer wiring.
- Sensor and actuator connections.
- Aftermarket accessory installation (lights, audio).
- Marine & Offshore:
- Marine electrical connections on boats, yachts, docks (bilge pumps, navigation lights, sonar, battery cables).
- Corrosion-prone environments.
- Industrial Machinery & Control Systems:
- Industrial electrical terminals in panels, motor connections, sensor wiring.
- Washdown environments (food processing, pharmaceuticals).
- Outdoor equipment.
- Renewable Energy:
- Solar panel wiring, wind turbine connections (exposed to weather).
- Outdoor Lighting & Infrastructure:
- Landscape lighting, signage, traffic systems.
- Aerospace & Railway (Specialized Grades): For vibration resistance and reliability in safety-critical systems (using specific high-temp/performance variants).
Selecting the Right Solder Sleeve Connector
- Wire Gauge Compatibility:Matching wire gauge is essential. Choose a connector rated for the combined gauge of the wires being joined. Common sizes:
- Red: 22-18 AWG
- Blue: 16-14 AWG
- Yellow: 12-10 AWG
- Other colors/sizes exist (e.g., 26-24 AWG, 8 AWG). Never force oversized wires.
- Insulation Diameter: Ensure the connector’s pre-shrink internal diameter accommodates the thickness of the wire insulation. Post-shrink, it must seal tightly.
- Environmental Requirements: Standard polyolefin is good. For extreme UV, chemicals, or higher temperatures, seek tubing rated for these conditions (e.g., fluoropolymer).
- Adhesive Type: Standard hot-melt works for most. For immersion or fuel resistance, specialized adhesives (e.g., butyl-based) are available.
- Certifications: Look for relevant industry certifications (UL, CSA, Mil-Spec) for critical applications.
Professional Tips, Tricks, and Critical Precautions
- The “Solder Flow Window” is Key: Never stop heating until you visually confirm the solder has completely melted and flowed around the wires. Incomplete flow means a weak joint.
- Avoid Overheating: Signs include bubbling/burning of the tubing, discoloration (brown/black), or insulation melting back from the stripped wire ends. This destroys the seal and insulation. If unsure, start with less heat/time.
- Mind the Gap: If joining wires of significantly different diameters, stagger the strip lengths slightly so the solder ring flows optimally around each.
- Support Long Runs: For heavy cables or long unsupported spans, add cable ties or clamps near the connector to prevent mechanical stress on the joint itself.
- Cold Environments: Heating takes longer. Pre-warm the connector slightly if possible. Ensure full adhesive flow is achieved for sealing.
- Storage: Keep connectors in a cool, dry place. Avoid exposure to solvents or excessive heat before use.
Limitations and Alternatives
- Not for Disconnectable Connections: Solder sleeves create permanent joints. Use plugs/sockets where disconnection is needed.
- Limited Reusability: Cannot be easily removed once heated and cooled.
- Space Constraints: While compact, the shrunk connector still requires more space than a bare wire joint (but less than many crimp connectors with seals).
- High-Current Alternatives: For very high continuous currents (e.g., battery cables), properly sized and crimped lugs with separate heavy-duty adhesive heat shrink may sometimes be preferred, though large solder sleeves exist.
Conclusion: The Gold Standard for Secure, Sealed Connections
Solder Sleeve Seal Heat Shrink Butt Wire Connectors, Terminals, Waterproof are not just another connector; they represent a fundamental shift towards creating electrically superior, environmentally immune, and mechanically robust splices. By integrating soldering, insulation, and sealing into a single heat-activated process, they eliminate common failure points associated with traditional methods. Whether you’re repairing a corroded trailer harness, installing marine electronics, or building industrial control panels, mastering these connectors is essential for achieving long-term reliability. By understanding the science behind their design, meticulously following the installation process, and selecting the correct product for the job, you can confidently create connections that withstand the harshest environments, ensuring safety and performance for years to come. Invest in quality solder sleeves and the right tools – your electrical systems will thank you.


